Connect Your Environment
What is an Environment?
An environment is the infrastructure you want your AI Assistant to manage — whether that's on-premise (physical servers, VMs, devices, or Kubernetes clusters) or cloud infrastructure (IBM Cloud VPC or Classic). You connect each environment to the platform through a Connector.
Why connect it to an AI Assistant?
Without a connected environment, the AI Assistant has no access to your infrastructure. Once connected, it can answer questions, diagnose issues, suggest fixes, and run tasks — all based on your real data. This is what turns the AI Assistant from a general helper into an operator that understands your servers, networks, and workloads.
You can connect the following environments to your AI Assistant:
- On-Premise Infrastructure & Devices
- Cloud Infrastructure
- IBM Cloud VPC
- IBM Cloud Classic
- AWS (coming soon)
- GCP (coming soon)
Connecting these enables:
- Infrastructure visibility – See and query your servers, networks, and resources.
- Intelligent troubleshooting & root cause analysis – Diagnose issues and identify potential problems across your environments.
- Guided remediation steps – Recommended actions and workflows to resolve issues safely.
- Backup, restore & migrate workflows – Orchestrate backup, restore, and migration for VMs and VPCs.
- Reports & assessments – Generate operational, compliance, and infrastructure health reports, with export and sharing.
- Autonomous tasks & automated remediation – Run scheduled and event‑driven tasks with built‑in guardrails.
Connecting an environment gives the AI Assistant the context it needs to deliver precise, actionable insights.
On-Premise Infrastructure & Devices onboarding
On-Premise Infrastructure and Devices allows you to connect servers, VMs, and Kubernetes clusters in your private or public networks so the AI Assistant can access and work with them.
Group devices into logical groups (e.g. by environment or team) so the AI Assistant can target them more effectively. Choose Via Proxy for resources that are not reachable from the internet and Direct Access only for devices with public IPs to keep access secure and predictable.
Choose connection method and add devices
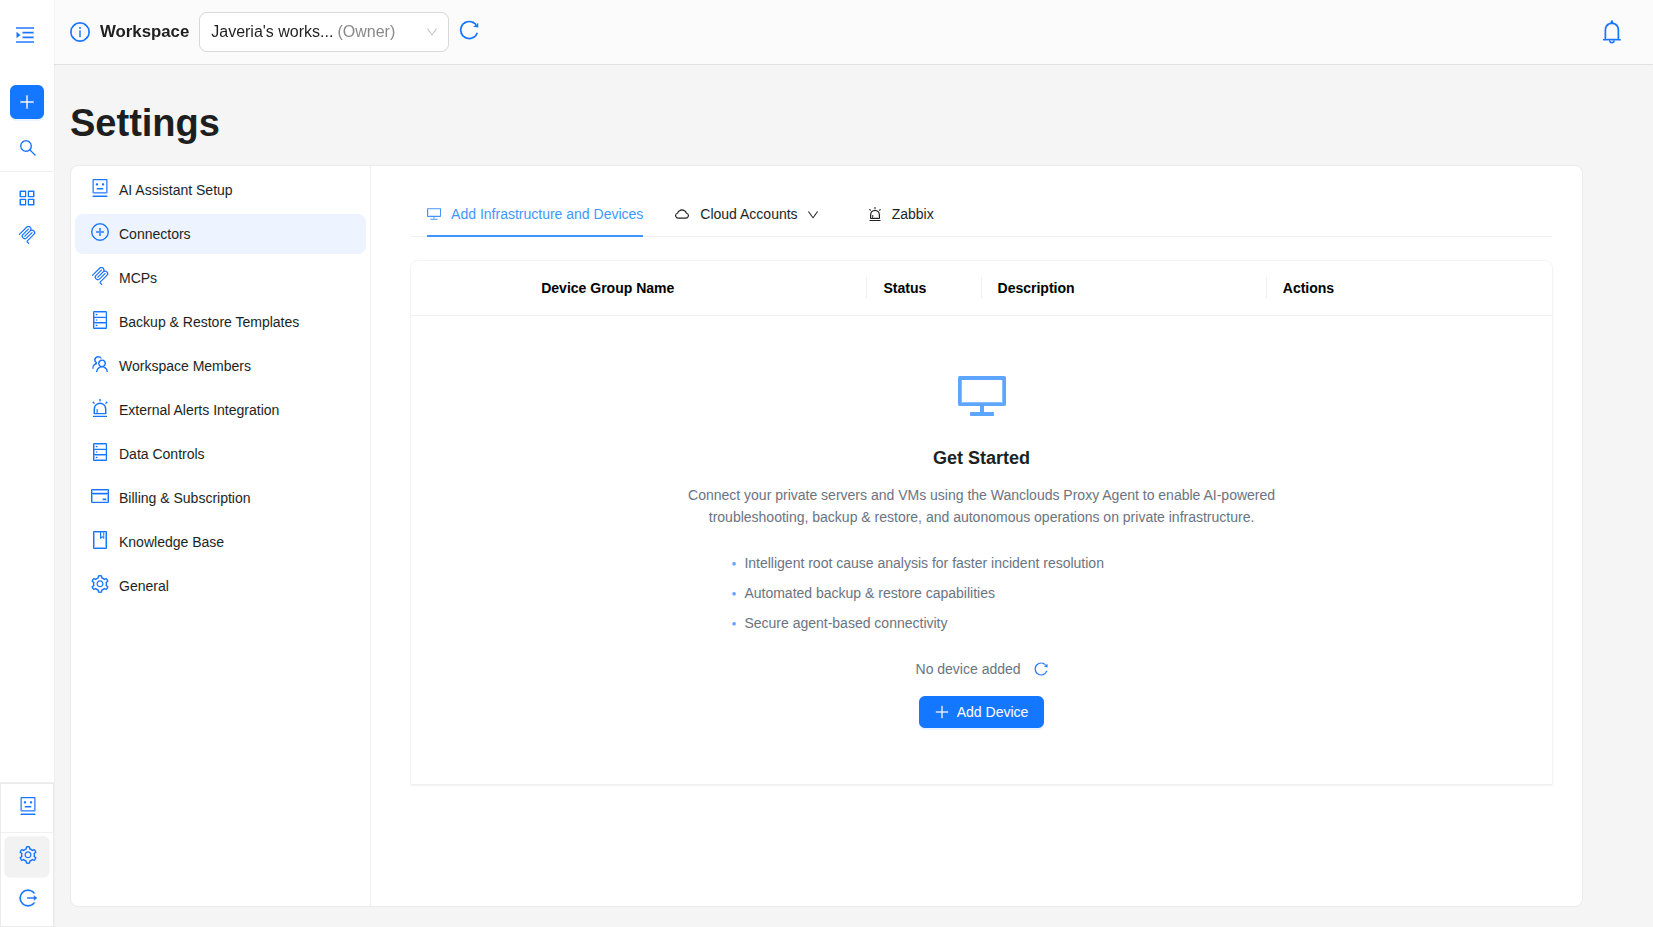
- Go to Settings → Connectors → Add Infrastructure and Devices.
- Click Add Device to start.
- Choose connection method
- Via Proxy (private): For devices with private IPs, Wanclouds Proxy Agent is required within your network. You can select an existing agent or set up a new one, then add devices that the agent can access via SSH (for Linux) or WinRM (for Windows).
- Direct Access (public): For devices with public IPs reachable from the internet. No agent required. You select a device group and add single device, bulk CSV, or Kubernetes cluster.
Via Proxy (Wanclouds Proxy Agent)
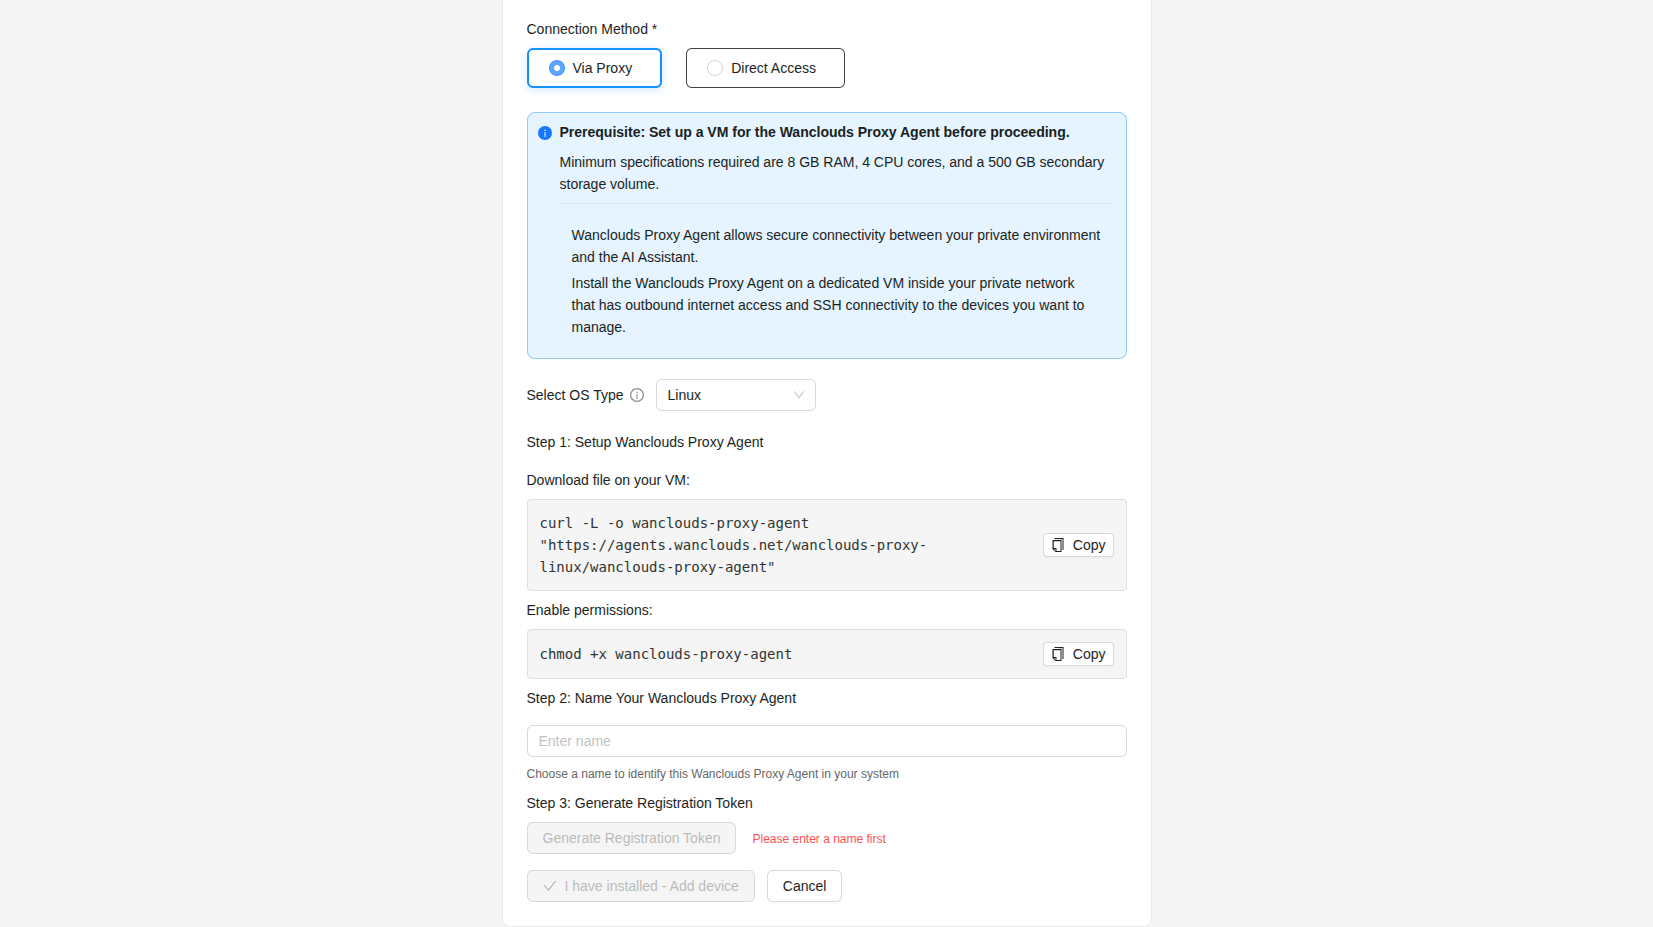
Prerequisite: Set up a VM for the Wanclouds Proxy Agent before proceeding.
Minimum specifications required are 8 GB RAM, 4 CPU cores, and a 500 GB secondary storage volume.
Wanclouds Proxy Agent allows secure connectivity between your private environment and the AI Assistant. Install the Wanclouds Proxy Agent on a dedicated VM inside your private network that has outbound internet access and SSH connectivity to the devices you want to manage.
If no agent exists, select Add Wanclouds Proxy Agent
Wanclouds Proxy Agent Setup
- Linux
- Windows
Select Linux as the OS type in the setup form, then follow the steps below.
Set up the Wanclouds Proxy Agent on your VM
Download file on your VM:
curl -L -o wanclouds-proxy-agent "https://agents.wanclouds.net/wanclouds-ai-prod/wanclouds-proxy/wanclouds-proxy-agent"
Enable permissions:
chmod +x wanclouds-proxy-agent
Name your Wanclouds Proxy Agent
Enter a Wanclouds Proxy Agent name in the form (e.g. prod-proxy-1). This name is used to identify the agent in the app.
Generate a registration token
-
Click Generate Registration Token. A one-time registration token is created and shown in the UI.
-
Copy the generated command and execute it on your VM:
# Example
sudo ./wanclouds-proxy-agent --register --token "<your-token>"
- Click "I have installed – Add Device". The new agent appears in the Wanclouds Proxy Agent dropdown. Use the refresh icon next to the dropdown if it does not appear immediately.
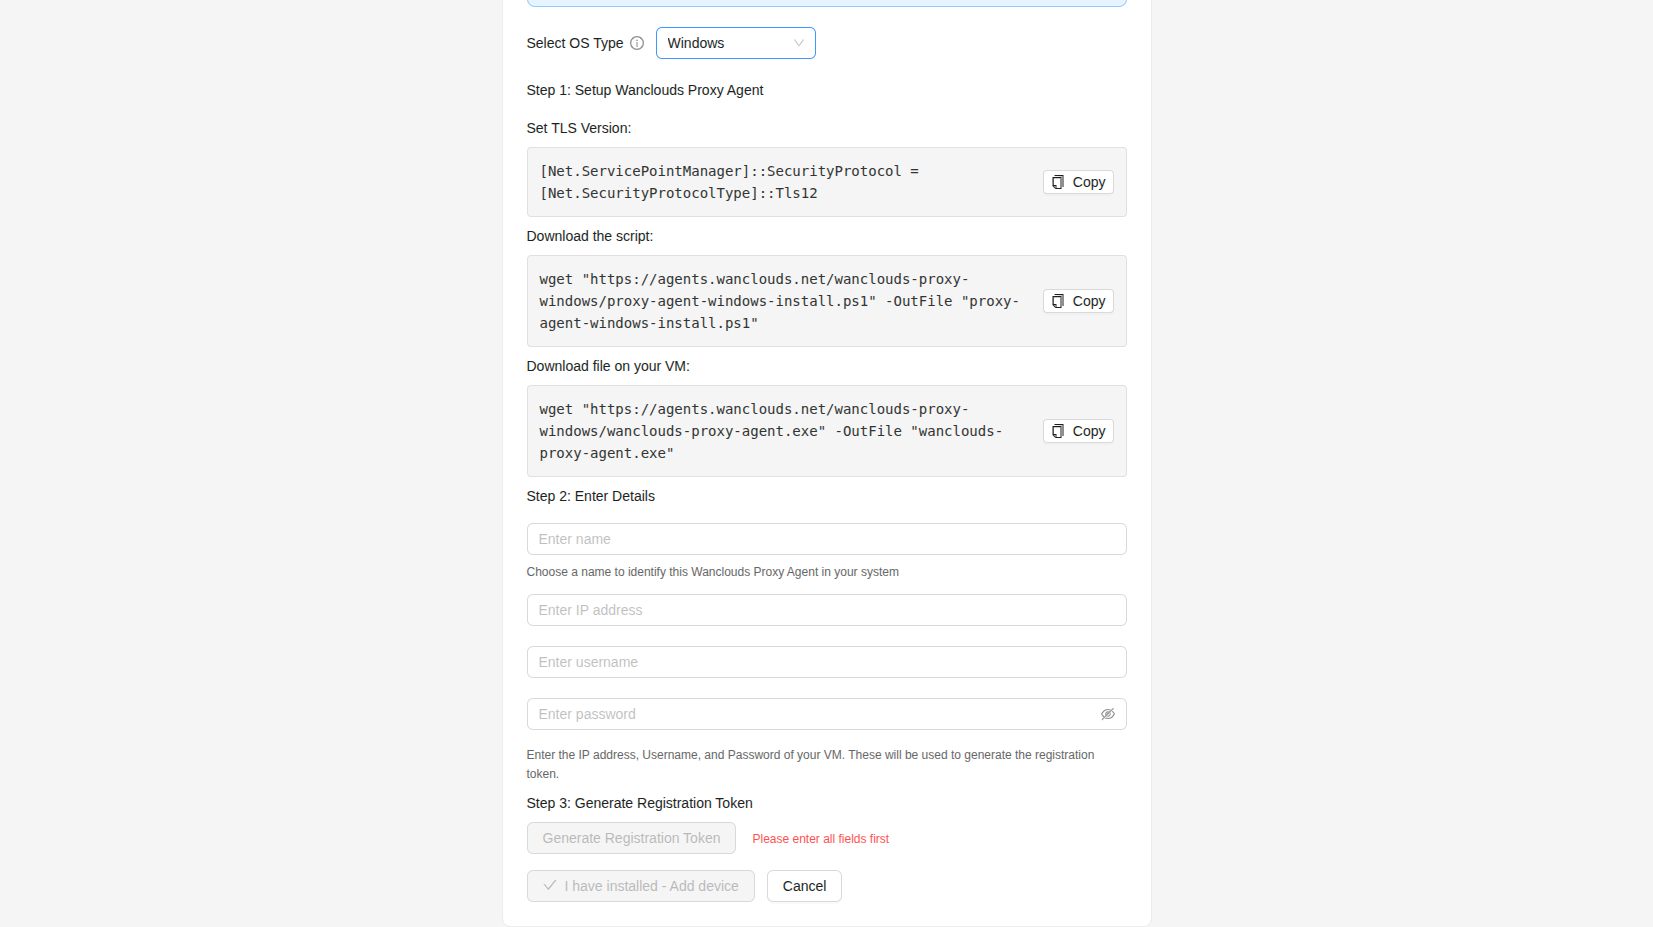
Select Windows as the OS type in the setup form, then follow the steps below.
Download and set up the agent on the Windows VM
Set TLS version (run in PowerShell on the Windows VM):
[Net.ServicePointManager]::SecurityProtocol = [Net.SecurityProtocolType]::Tls12
Download the script:
wget "https://agents.wanclouds.net/wanclouds-proxy-windows/proxy-agent-windows-install.ps1" -OutFile "proxy-agent-windows-install.ps1"
Download the agent binary:
wget "https://agents.wanclouds.net/wanclouds-ai-prod/wanclouds-proxy/wanclouds-proxy-agent.exe" -OutFile "wanclouds-proxy-agent.exe"
Enter Wanclouds Proxy Agent credentials
Fill in the following fields in the app form:
| Field | Description |
|---|---|
| Name | Agent display name (e.g. win-proxy-1) |
| IP address | IP of the Windows VM where the agent will run |
| Username | Windows user for the agent machine |
| Password | Password for that user |
These credentials are used to generate the registration token.
Generate a registration token
-
Click Generate Registration Token. A one-time registration token is created and shown in the UI.
-
Copy the registration command from the app and run it in PowerShell (in the directory where you downloaded the script and binary). Wait for it to complete.
# Example
.\proxy-agent-windows-install.ps1 -Register -Token "<your-token>"
- Click "I have installed – Add Device" in the app. The new agent appears in the Wanclouds Proxy Agent dropdown. Use the refresh icon next to the dropdown if it does not appear immediately.
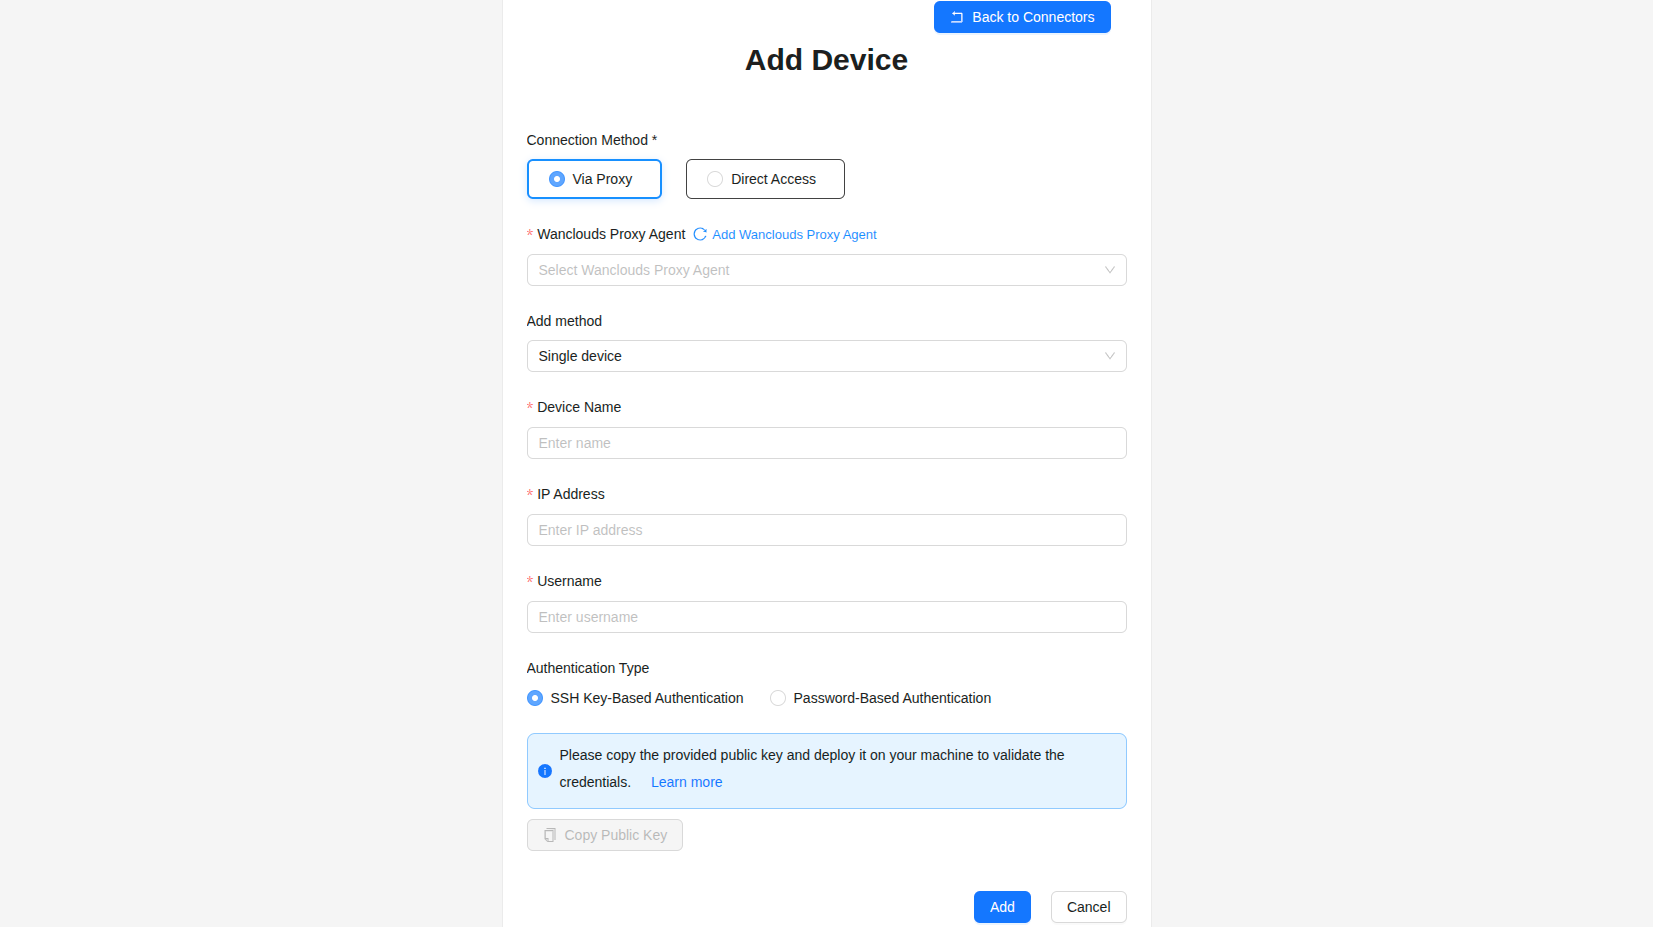
Add Devices – Via Proxy
-
Select Wanclouds Proxy Agent from the agents dropdown.
-
Add method: Single device only — bulk/CSV is not supported via proxy.
-
Fill in device details:
- Enter:
- Device Name
- IP Address (Private IP reachable by the agent)
- Username (SSH or WinRM username)
- Authentication:
- SSH key – Use a SSH key installed on the VM - or
- Password – Username + password for the device.
- Enter:
-
Click Add → the device is added to the group associated with the selected agent.
-
Refresh the Connectors table to see updates.
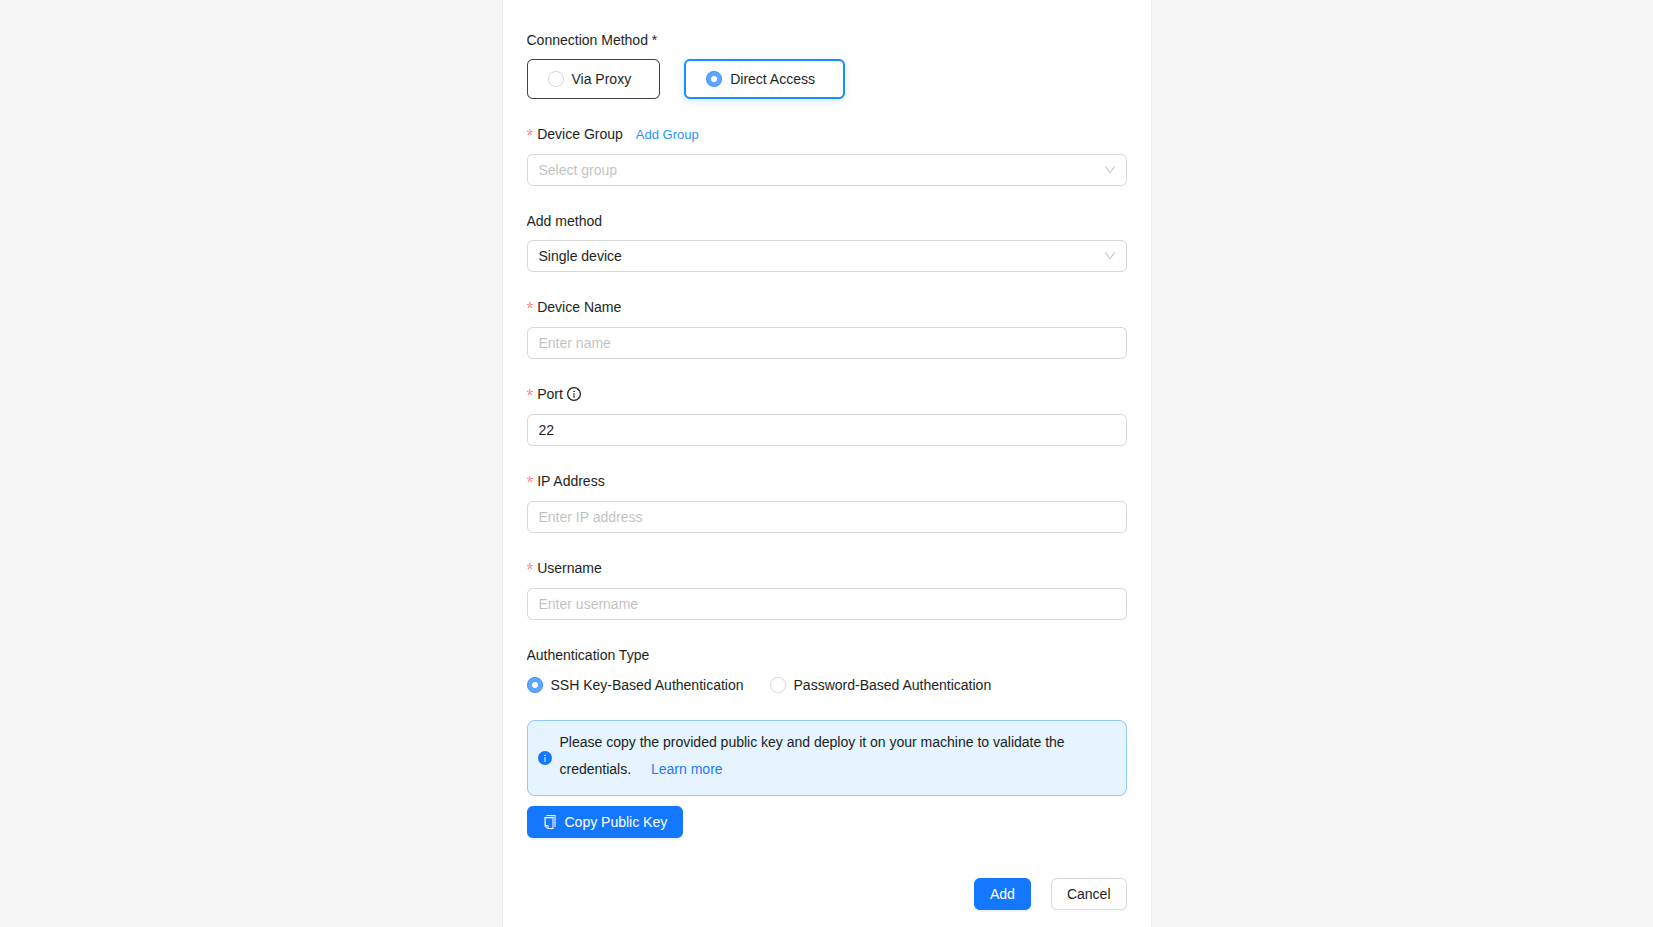
Add devices – Direct Access
-
Choose a device group. Create one if needed.
-
Select Add method:
-
Single Device
- Enter:
- Device Name
- IP Address (public IP reachable from Wanclouds)
- Port (Port number used to connect to this device via SSH, e.g.
22, or WinRM, e.g.5985) - Username
- Authentication:
- SSH key – Use a public key installed on the VM - or
- Password – Username + password for the device.
- Enter:
-
Bulk CSV
- Click Upload CSV and select your file.
- Use the CSV template (downloadable from the UI) to ensure correct columns and formatting.
- Each row represents a device with fields like name, IP, port, and authentication details.
-
Kubernetes Cluster
- Upload a kubeconfig file.
- Enter Cluster Name and an optional Description.
-
-
Click Add.
Devices or clusters appear under the selected group.
Adding SSH public key to the VM
Adding your SSH public key to the VM (if using SSH key authentication)
1. Log into the VM
Use SSH to log into your VM:
ssh your-username@your-vm-ip
2. Create the .ssh Directory on the VM
Once logged into the VM, check if the .ssh directory exists in your home directory:
ls -al ~/
If the .ssh directory does not exist, create it:
mkdir -p ~/.ssh
Set the correct permissions for the .ssh folder:
chmod 700 ~/.ssh
3. Add the public key to authorized_keys
nano ~/.ssh/authorized_keys
Paste your public key, then save and exit (Ctrl+X, then Y, then Enter).
4. Fix permissions
Set the proper permissions for the authorized_keys file:
chmod 600 ~/.ssh/authorized_keys
5. Ensure SSH Configuration Allows Key-Based Authentication
Check that the sshd_config file is properly configured to accept key-based authentication
sudo nano /etc/ssh/sshd_config
Ensure the following settings are enabled in sshd_config:
PubkeyAuthentication yes
PasswordAuthentication no
ChallengeResponseAuthentication no
AuthorizedKeysFile .ssh/authorized_keys
6. Restart SSH Service
Restart the SSH service for changes to take effect:
sudo systemctl restart sshd
After this, the VM will accept the SSH key used by the Wanclouds Proxy Agent.
Verifying your on-premise connection
- Go to Settings → Connectors → Add Infrastructure and Devices.
- The table lists Wanclouds Proxy Agents (via proxy) and Device Groups (direct access).
- Expand a Wanclouds Proxy Agent or device group to see:
- Devices – Name, IP Address, username, and actions.
- Kubernetes clusters (if any) – Last synced.
If you don’t see your proxy agent or device group—or the devices within them—try refreshing the table. It may take a moment for new connections to appear.
Cloud Infrastructure onboarding
Supported Cloud Providers
Currently supported:
- IBM Cloud VPC – Virtual Private Cloud infrastructure
- IBM Cloud Classic – Classic infrastructure accounts
Coming soon:
- AWS – Amazon Web Services
- Google Cloud Platform – GCP
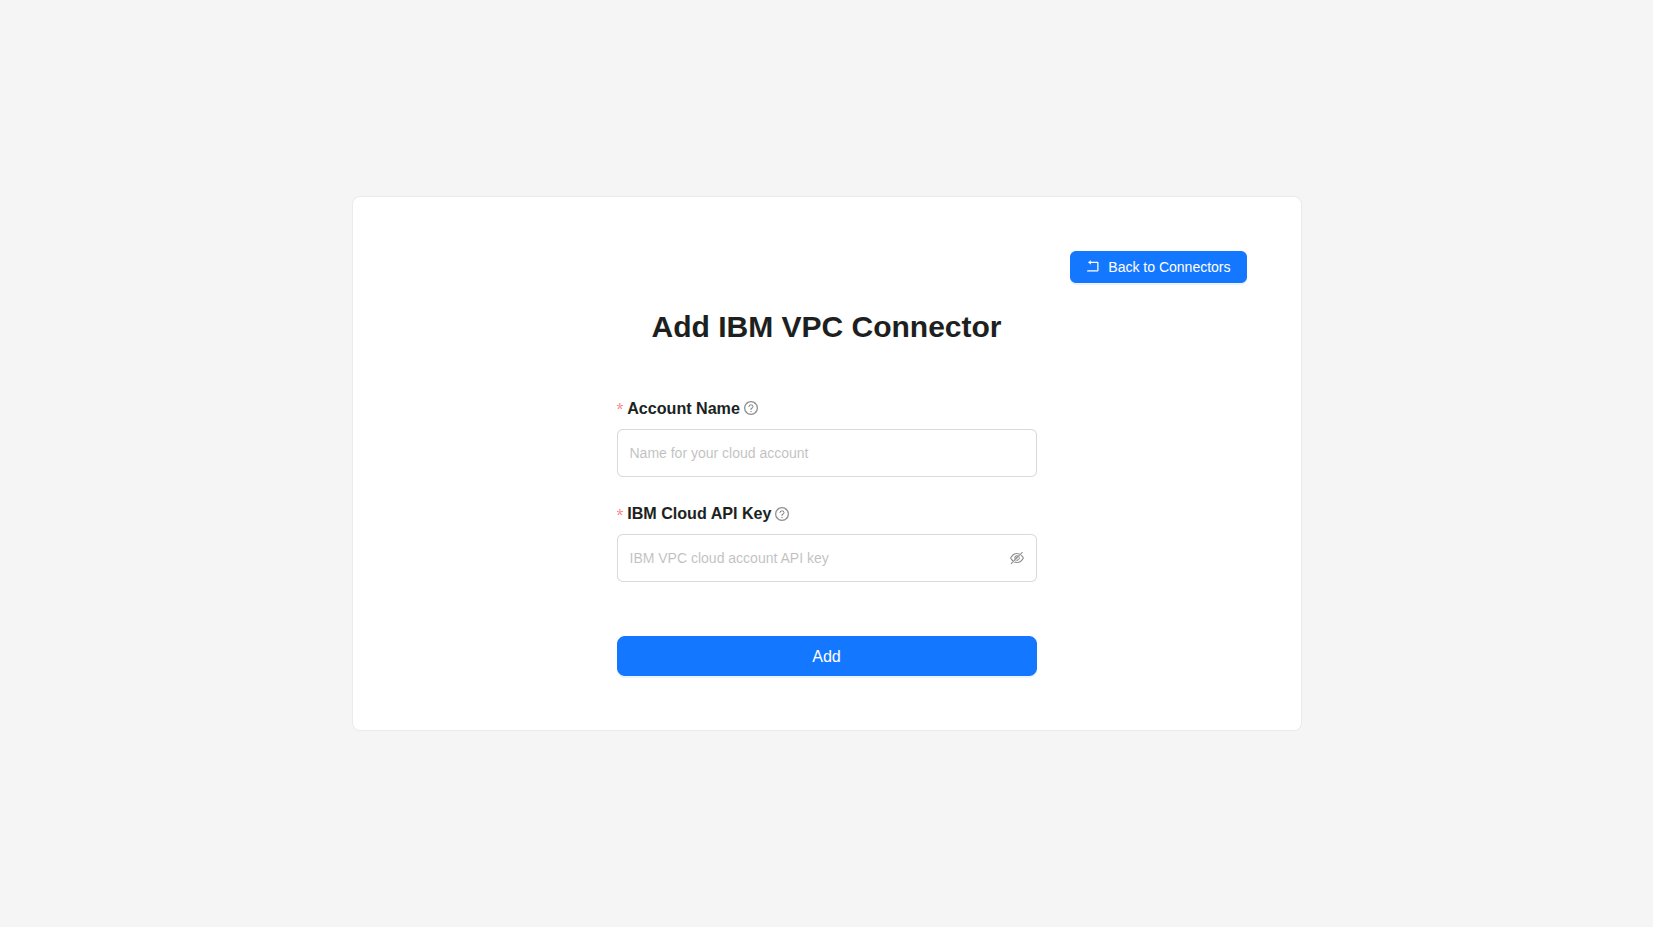
Adding an IBM Cloud VPC Connector
- Go to Settings → Connectors.
- Under Cloud Infrastructure, select IBM Cloud VPC from the dropdown.
- Click Add Connector.
- Fill in:
- Account Name – A friendly name for this connector (e.g. “Production VPC”).
- IBM Cloud API Key – Your IBM Cloud API key. You can create or manage API keys if needed.
- Click Add.
- Wait for the connection to complete. You’ll be redirected to the Connectors page.
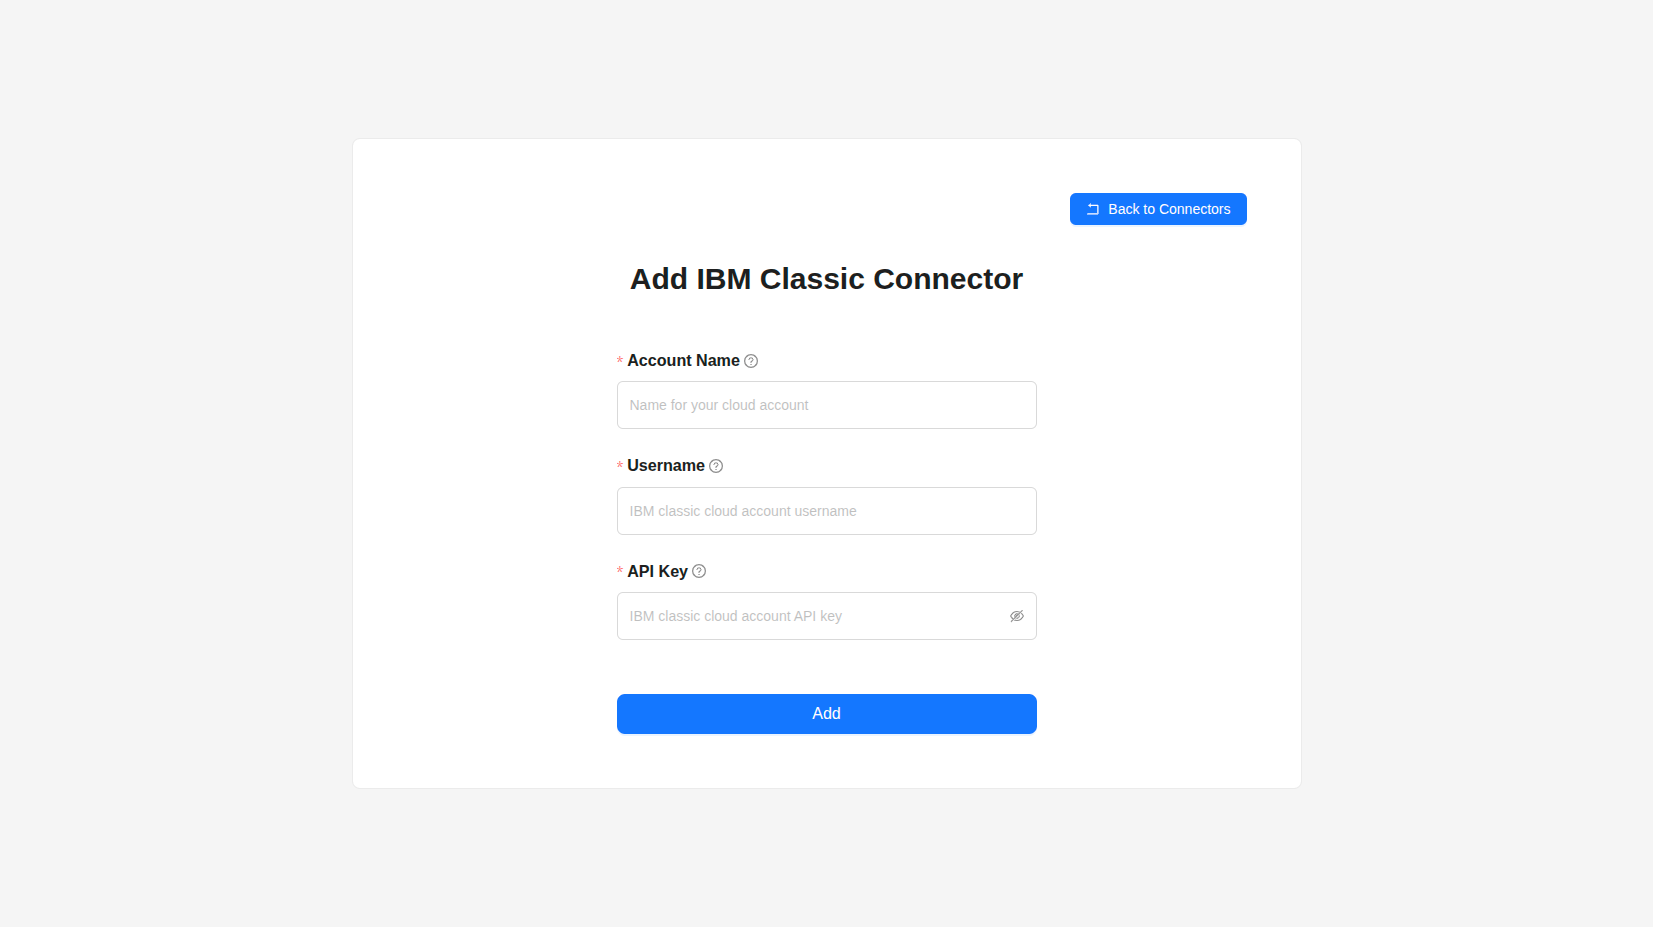
Adding an IBM Cloud Classic Connector
- Go to Settings → Connectors.
- Under Cloud Infrastructure, select IBM Cloud Classic from the dropdown.
- Click Add Connector.
- Fill in:
- Account Name – A friendly name for this connector.
- Username – Your IBM Cloud (SoftLayer) username.
- IBM Cloud API Key – Your classic API key. The form links to IBM docs for classic keys.
- Click Add.
- Wait for the connection to complete. You’ll be redirected to the Connectors page.
Connection usually finishes within a few minutes. Use the refresh control on the Connectors table to update the list.
Verifying Your Connection
- Go to Settings → Connectors.
- Stay on Cloud Connectors and select IBM Cloud VPC or IBM Cloud Classic as needed.
- Find your connector in the table.
- Status should show VALID (displayed as active) when the connection is healthy.
- You can then use this connector when creating or configuring an AI Assistant.
Managing Connectors
- Open Settings from the sidebar.
- Click Connectors.
- Open the tab for your connector type:
- Add Infrastructure & Devices – For on-premise infrastructure and devices.
- Cloud Connectors – For cloud accounts (e.g. IBM Cloud VPC or Classic). Choose the provider from the dropdown.
- Connectors will be listed in a table.
Editing a connector
- In the Actions column, open the menu (⋮) for the connector.
- Click Edit option.
- Update the fields as applicable.
- Click Update and wait for the redirect back to the Connectors page.
Removing a connector
- In the Actions column, open the menu (⋮) for the connector.
- Click Delete option.
- In the confirmation modal, review and click Delete to confirm.
Deleting a connector can affect any AI Assistants that use it. Ensure no active AI Assistants depend on this connector, or reconfigure them afterward.
Troubleshooting
Connection fails or stays invalid
- Credentials – Confirm credentials (e.g. API key, username, or SSH key) are correct and not expired for that connector type.
- Permissions – Ensure the connector’s credentials have the required permissions for the resources you want to manage.
Connector not in the list
- Refresh – Use the refresh control on the Connectors table.
- Wait – If you just added it, wait for the connection task to finish and check notifications.